Mandarin Collared Fairfield
- Cora
- Feb 13, 2020
- 7 min read

Updated: Jan 13, 2021
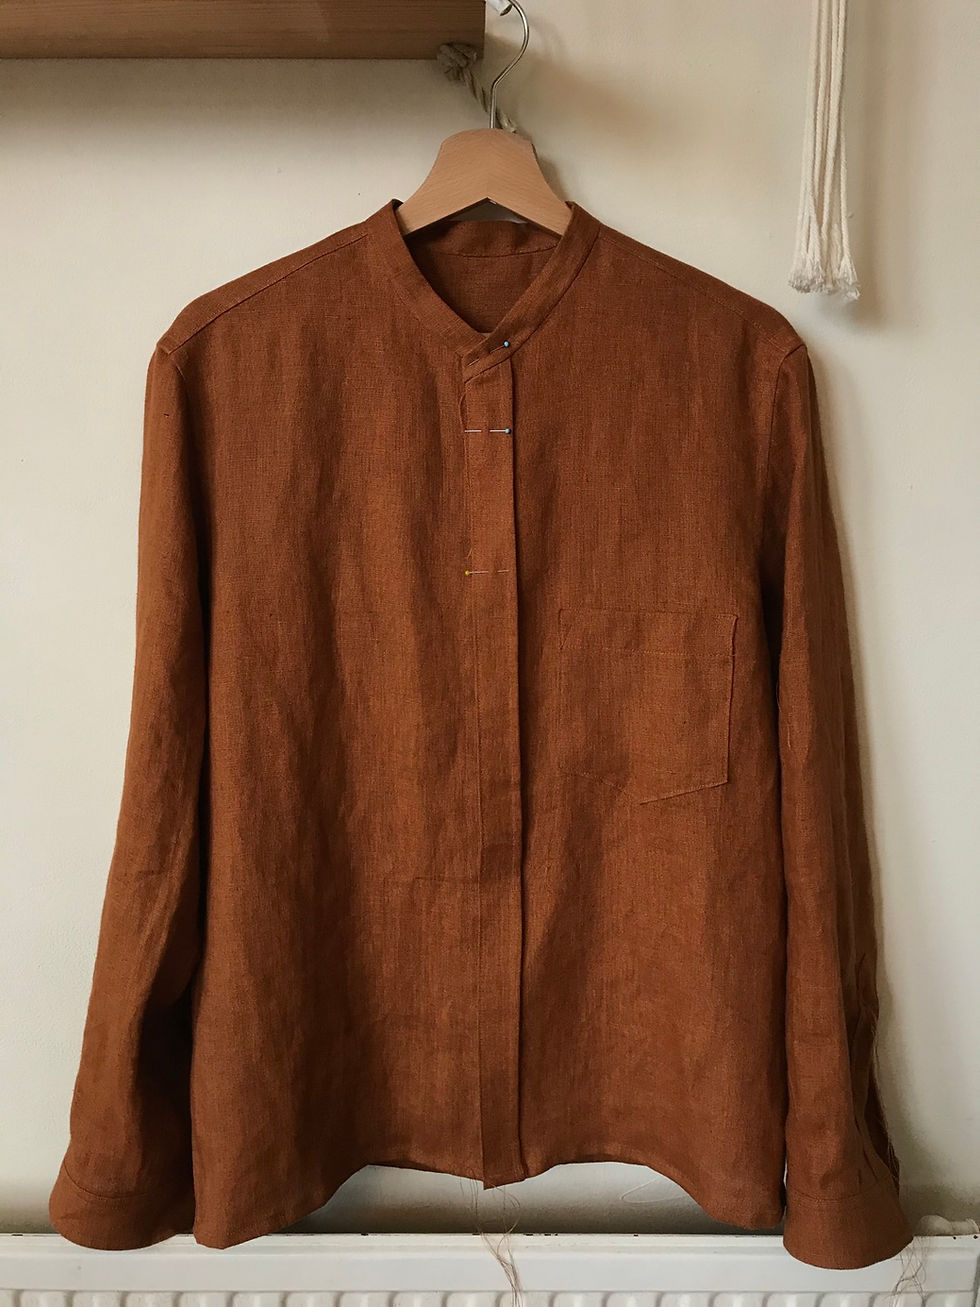
Just over a month after Christmas and I finished David's present. This is my second go at the Fairfield, and jointly the second shirt I've made for him too. His first was in a Gingerbread Tweed which is lovely, but quite scratchy on the skin and quite thick for a shirt so he tends to only wear it for special occasions and over a polar neck. I wanted to be able to make something he could incorporate into his everyday clothes which is why I chose linen. He doesn't have anything in linen and I think he's missing out, especially in the summer. It was also a chance to introduce some other colours too, because he has a lot of blues which means he sometimes ends up involuntarily blue from head to toe.

Prep
I used this as a chance to splash out on some Merchant and Mills linen, a first for me. The quality did not disappoint, it's so much softer and more refined than the linen I have bought in the past form MyFabrics. I chose Boston Falls, a beautifully autumnal colour, very rich. I bought my buttons here too, navy Corozo that are wider (14mm) than the pattern recommends (1cm or 1.3cm). I love the way they go with the burnt orange:

I fit this Fairfield (size Medium) out of 1.5 metres, which really helped me out financially, making a big difference when linen is £19.75 per metre. The pattern dictates 2.1 metres for the whole XS-XXL size bracket for 150cm wide linen. This is wide (143cm) and I could easily fit in what I needed. Also, I had a sizeable chunk leftover because everything you see on the left hand side (the front shirts) are cut one, so there was that size of fabric left underneath.

I checked David's previous shirt on him for fit and it seemed fine. Like I did before, I squared off the hems and shortened them by 5.5cm for a simpler look. I decided to make a mandarin collar this time, but I didn't look into whether I would need to change the shape of the under collar pattern piece at this point so cut out the original collar. Later on I made another pattern piece and recut the collar.
I also made the pocket shape different to the pattern, and different to the large square pocket I made last time. Thread Theory actually have some free downloadable alternative pockets which are great, and which I didn't discover until after I had drawn my own. The pattern has a pocket with two short sides on the bottom corners and one longer straight edge on the very bottom, kind of like a hexagon shape. David wanted one like on some of his other shirts, the classic bottom edge made of two sides coming to a point in the middle.
The Process

It took me about a month to make this shirt all in all, it felt like it was taking me quite a long time.


The cuffs and sleeve plackets

What really helped me here was my new Clover marker (pictured above). The thing I dread about sleeve plackets is all those pattern lines that you have to transfer onto the fabric. The clover marker made this much easier; lay the paper pattern piece on top of your fabric piece and draw over the lines using the marker pressing down hard. The marker works especially well with linen because of how it can be creased so easily, it wouldn't work with lots of other fabric. Once the indentations are made you can then go over them with your chalk to make them more visible.

Sewing the plackets shut at the end was a bit fiddly as my lines didn't line up as much as they should, and I find that triangle shape at the top of the placket so hard to make neat! Got there in the end.


I also really enjoyed using another new Christmas gift tool- Rocking Stitch's Measuring Gauge. It was so helpful for flat felled seams and quickly measuring them.
Side seams and sleeves attached:

I used the gauge here to help me standardise my flat felleds.


The Mandarin Collar:
I assumed I could leave off the collar and have only the collar stand to make a Mandarin collar. I saw some tutorials showing to draft a more curved shaped collar, so after asking on Instagram, some people confirmed that it needed to be a different shape. I used this very easy tutorial to modify my collar stand into my Mandarin collar. It doesn't look super curved, not as curved as theirs, and I wonder if it would look better if it was.
I made the collar slightly thinner than my collar stand, but not by much- less than 1cm. Although I think perhaps the ends are a bit thinner than the rest of the width, as they are noticeably quite a bit narrower once attached. I think it was perhaps a bit too small, next time I would use a smaller SA when sewing the two collar pieces together.


I sewed on the new collar without much difficulty, just had a bit of faff getting the end edge to finish in the right place so did some unpicking and resewing. I wasn't sure about the look of it at first but some lovely people on the gram said they thought it looked great, so I didn't unpick it and redo it.
Cuffs added, makes such a difference:
Buttons and button holes
Another tool I enjoyed using and don't use often is this flexible button measuring gauge. I didn't use the pattern markings, but instead looked at where the buttons are on some of David's shirts, measured where the first button comes below the collar and the gap in between the rest of the buttons and used this as a base.

I had to sew three of the button holes twice, because they were just a little bit too short or too long but in a noticeable way. I was very pleased with how neat they looked though.

Top button-hole placement
One of the things I've never been sure about with a shirt is where to place the top button hole. This is where I first sewed it, but I later changed it after watching this youtube tutorial and looking again at David's shirts. I learnt you should make button hole parallel to the bottom line of the collar, not the top (which is what I did first.

Everything was going pretty smoothly until this point. Then I opened the fray check, was about to gently squeeze it onto the first button hole, and a drop fell out onto my fabric above the button hole. This caused me quite a bit of grief for several days trying to work out what to do. You can see in the photo below the faded mark, it's quite hard to capture on camera but it was SO noticeable in real life.
What you should do:
-Do not try to get it out with soap and water (like me). This didn't get it out, and instead faded the dye of my linen which then created a bigger problem in itself to cover up.
-Use surgical spirit (in the UK) or rubbing alcohol (if you're in the US). Test on a scrap of the fabric first to see how it dries, then use a small amount using something like a cotton wool bud.
In my desperation I read quite a few different blog sites that all recommended rubbing alcohol. Some recommended nail varnish remover and it did not work- so don't use it. I was even asking my colleagues what this rubbing alcohol was, having never heard of it, and when I went to Boots I found out our version in the UK is just Surgical Spirit!

The spirit did remove the concentrated white patch of the plastic, but it did nothing of course for my faded dye. Some people suggested visible mending, but I wasn't convinced it would work in this exact spot, so centre front and visible, coupled with the fact that I don't think it's David's style.
I just sat with the shirt thinking of what to do and the thought occurred to try to cover over the dyed threads by using new threads. I pulled strands out of a scrap piece, fairly long ones to make it easier. I followed the lines of the warp and the weft, going over the top of the dyed yarns.

I think this would have been much more effective if the fabric had been yarn dyed and therefore every bit of the thread was dyed. However, as it was not, when you start to fray the fabric you can see that it is 'stripy' because little sections have not been dyed when they are covered by another thread. This made the task so much harder, because I then had to try to make sure these undyed parts weren't showing. I tried my best, and pulled and tugged at them to move them about but there's only so much you can control.

I kept adding more threads so that I was covering the whole area and more so that it could fade out and not look so obvious. Once I thought I had covered basically all threads I then weaved in all my ends into the fabric and tied them off somewhere discreet to the side and hid them into the fabric again.

I was a bit disappointed that it still looked faded, but I do think it looks better than before, and that's a result.


Once the buttons themselves were sewn, I resewed one of the hems because they weren't even, and of course it was the hem on the top that was 1cm shorter than the back so you could see it. I made the back one shorter by unpicking it to the side seam and levelling it out.


I chose not to add those extra buttons onto the sleeve plackets, just becuase the plackets themselves were quite narrow and I wasn't sure it would look that neat. I added these buttons with my last Fairfield, but this time the packet wasn't sitting as neatly over itself so I think it could have looked a bit wonky. I would have added them if David wanted them, but he wasn't bothered.

Pattern: Fairfield Shirt by Thread theory (s. Medium)
Fabric: 1.5m of Boston Falls Linen (Merchant and Mills)
Buttons: Navy Corozo 1.4mm (Merchant and Mills)
Mods: Mandarin collar, pocket and hem. View with pleated back.
A more detailed process is saved in my Story Highlights on my Instagram.


"Absolutely enchanted by the timeless beauty and craftsmanship of this Block Print Linen Fabric! The intricate block prints add a touch of elegance and uniqueness that sets it apart. The natural breathability of linen only enhances its allure, making it a perfect choice for my creative projects. Can't wait to dive into my next sewing endeavor with this exquisite fabric. Ready to elevate your creations? <a href="https://fabritual.com/">Order now</a> and experience the enchantment firsthand!"