A lined wrap coat for winter (Burda 6704)
- Cora
- Oct 9, 2019
- 12 min read
Updated: Feb 24, 2020

Fabric, Pattern & Prep
I have been dreaming of making a grey wrap coat for two years but it took me a while to find the fabric, pattern and time to have a go at drafting a lining. I was really after a light grey coating, with a softer and squishier handle, but I could not find this anywhere. After a year of looking and not finding, last winter I bought some coating in My Fabrics' sale that was medium grey and decided that would be good enough (and I wanted to take advantage of the price). It was £15.45 reduced to £12.36 a metre. I bought three metres (I have maybe 1m leftover).
It's a medium weight fabric with a slightly rough texture, a few hairy bits poke out here and there. Despite not being super thick, it is heavy which gives the coat a good weight. When I bought it, it reminded me of an office carpet, but I hope that now it has taken coat form, it is less evocative of tapisserie.

I chose the pattern by scouring through an online paper pattern retailer and finding the best one that suited my Pinterest pins of coat shapes. It's the Burdastyle 6704 which is a simple unlined wrap coat. However, I knew I wanted to line it so that it would be warm enough for Winter, especially after my disappointment with my Sapporo being not very warm (even though it is lined). I've never drafted a lining before for a pattern so I put it aside for another time.


Last November I saw there was a sale on Craftsy/Bluprint web classes and had a look to see if there was anything to help me learn about lining. I was in luck, there is a class called "Mastering Construction: Facing and Linings with Sara Alm". It was reduced from £37 to £13! I couldn't believe it, there's no way I would have paid full price. Once you've paid, the class is in your Blueprint library forever.
Having a bit more free time after finishing my master's course and the seasonal change spurred me on to pick up the project again. I contemplated making Named Clothing's Halla Coat from Breaking the Pattern, I really like the oversized look and lapels, but you need a lot of notions, which I didn't have and I didn't have the money to buy them.
I watched my e-class before cutting out the project, to know if I could really make a lining. The class is split up into sections which each have their own subsections including how to draft the pattern, how to prep for sewing and how to sew it; Lesson 1- Introduction to Facings and Linings, Lesson 2- All in one facings, Lesson 3- Introduction to Linings, Lesson 4- Simple bagged linings, Lesson 5- Bagged lining with sleeves, Lesson 6- Lining garments with vents and slits, and Lesson 7- Bagged linings with vents and slits. The one that was particularly helpful for me was Lesson 5 but I watched 1-5 because she refers to techniques used in making a bagged skirt earlier on. Sara is a really good explainer and teacher and I definitely recommend her classes if you need extra help with something that seems daunting. It's so helpful as a visual learner to see someone construct what they are talking about in front of you. I followed Sara's instructions nearly to the letter, just changing the way I did my lining to self hem (more on that later), which was my last step in making the coat.
I had a proper lining fabric from Fabworks (satin acetate) which I had bought ages ago as part of a plan to make a different coat (out of an amaaazing thick checked coating which resides at my parent's house- see below). I haven't made that coat yet because I am yet to see the perfect pattern, I want an oversized boxy look with an oversized lapel, kind of like this coat from Plümo:

I think my 'real' lining would be fine for the checked coating, because that fabric is the star of the show and the lining complements its dark blue shade. But for my wrap coat, which is just plain grey, the lining feels more important and I love to be able to do something a bit more fun in the inside if I'm keeping the outside plain, especially because I don't have many prints in my wardrobe (which is how I like it). I'm just working from my stash this year (and foreseeable future), so I don't have a lot of choice. Luckily, when last visiting my parents I brought back with me some fabric from my mum's decades-old stash, with no specific plans. It is lightweight, fluid and drapey, and out of all my Bristol stash it was the most appropriate lining fabric. I loved the way it went with the grey coating, and using it as a lining would be lovely because although I really love its colours and paisley pattern, I wasn't sure about its print fitting in with my wardrobe on its own. A lining is therefore a perfect fit; it's lovely to be able to use it and for it not to be left un-admired in a drawer.

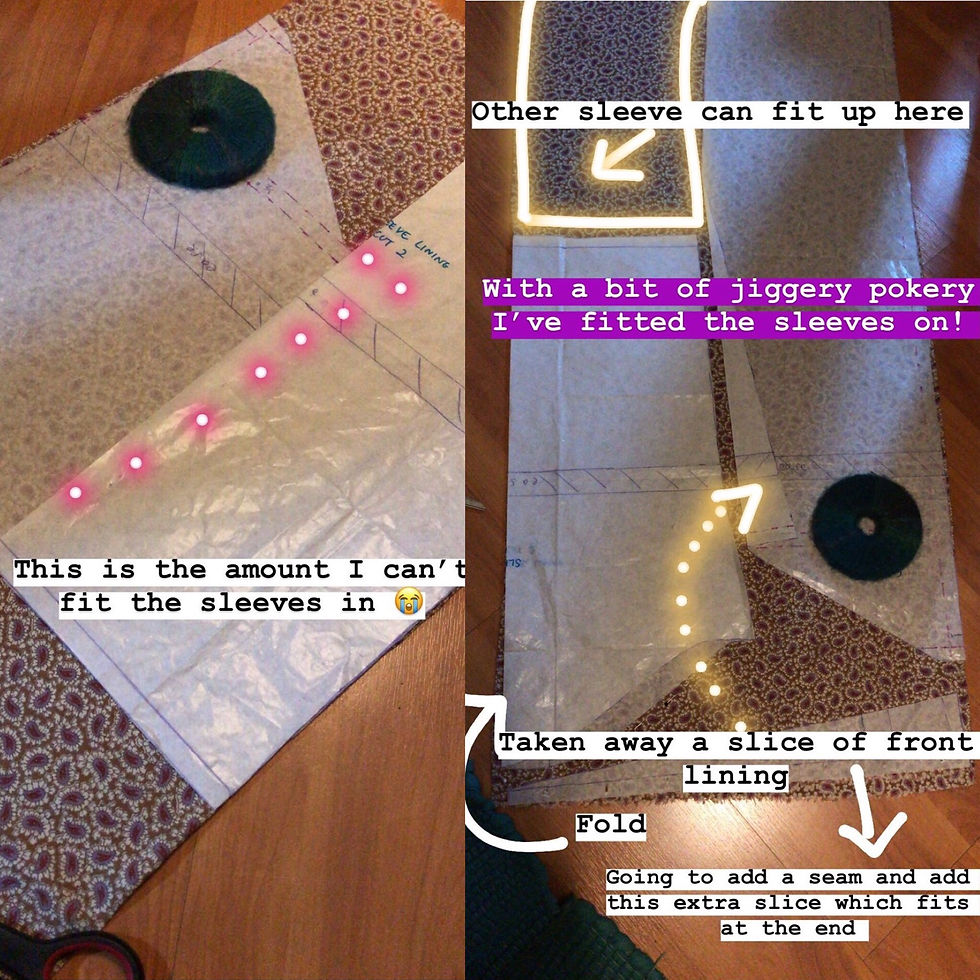
After drafting my lining pieces, I laid them down to see if I had enough Paisley, I did, but not for the sleeves! I realised I could use the blue lining for the sleeves and no one would see. While I was cutting out my pieces a few days later though, I tried just for fun to see if I could fit the sleeves in some dead space along the fold, and they could! I had to shave off some of the front lining side though- I took away a thin triangle, and was able to cut out that extra triangle (along with extra seam allowances) in another place. I managed to fit the sleeves in by a whisker, but I got there in the end and I am so pleased. The seam created in the front lining is barely perceptible because of the busy print, luckily.


I then thought I surely wouldn't have enough for pockets, but after sewing two scraps together I did! Luckily the pattern called for only one half of the pocket to be lining, the other Self fabric. I interfaced the lining side to make them sturdier.


Fit and Mods
I made a size 10, the smallest in the packet, and graded up a size around the arm holes because the last thing I wanted was to make a coat I could not wear over jumpers. It's hard to tell if I really needed to do this. Yet to wear it over a thick jumper.
Obviously I added a lining.
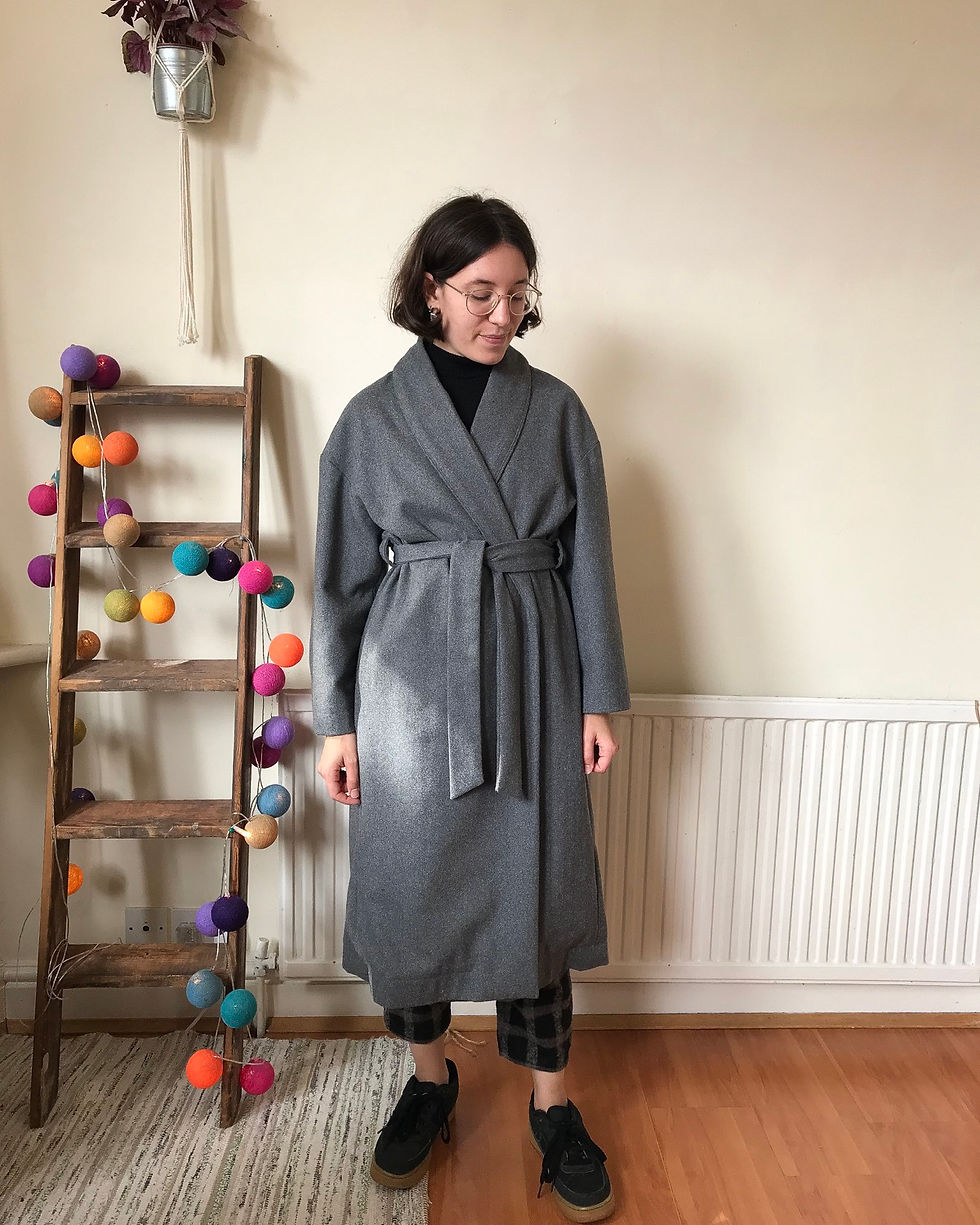
I shortened the length a lot, making in-between view B and C.
The fit seems fine but the shoulder are definitely too wide. Luckily it just looks like a drop shoulder (well I think it does), but in future I would change this if I made it again.
View A and B have a cuff for the sleeve which I didn't even notice until I saw the pattern piece, I don't like that look at all (too pirate like) so I left it off and made a normal hem.
I made the in seam pockets bigger.
I added a coat hook.
I added belt loops.

Drafting the lining
I won't go through every detail of how I drafted the lining, because it's saved in my instagram story highlight and it's quite lengthy (see Lining a coat). Sara gives you all the information you need to know and has some great tips like adding a vertical 'jump pleat' that isn't really pleated but just adds extra length in the body and sleeves for movement, as well as raising the arm holes slightly. She also suggests adding horizontal ease to the back piece by using a pleat in the centre top and bottom. Sara suggests drafting the front pieces to have a special shape at the bottom so that they can be sewn all the way down the facing at the centre front, but taper up towards the side seam edge (see below and more on this later).

Constructing the coat
Putting it together was *fairly* straightforward. An interesting feature is that the Back is cut two, rather than cut one on the fold. Something to take notice of, as I didn't, and cut one on the fold that was therefore 3cm wider. I didn't want to risk it being too big so cut it in half and used those 3cm as a seam allowance. If I had known I would have reduced the pattern piece and cut on the fold, I'm not sure what the point of the back seam is!


The coat has a rather interesting way of creating the neck/collar area. I go into detail in my story, but essentially it has a vertical dart either side of the neck. You cut these darts open then sew the under collar to the neck. Then you can then flip the under collar right sides together onto the neckline and sew one seam which both attaches under collar to the neckline and sews the darts.


Issues
Machine
I learnt about the perils of lint! I noticed every time I sewed some of my coat there was a lot grey dust on the floor, so I should have known to empty my machine of its lint properly. I did periodically open the door and take some out but didn’t realise how it can get caught under the presser foot plate. I started to sew the lining and my machine was not having it. I thought maybe it was because of the fluid fabric, so it took me a while to realise what the problem was.
It was sewing lots of tiny tiny tight stitches, skipping stitches and breaking fibres of the fabric so that small fluffy bits appeared sometimes and would not easily feed the fabric through either. Starting at a raw edge was hell, it would not move forwards to backwards to back stitch. I tried several different things; changed my needle twice, changed tension, stitch length and the plus/minus button on the top of the machine.
Then I googled it in desperation and saw someone who said that lint stops the feed dogs working and this can a) cause the machine to not pull your fabric through properly and b) makes it have tiny stitches! I unscrewed the plate with a screwdriver (first time ever) and found sooo much lint. Lint had even compressed itself in little channels so that it formed solid rectangles. Once cleared out, it was my machine again! I'll never make this mistake again.

The collar
It seemed as if the whole collar, under collar, front facing back facing once sewn together wasn’t going to fit properly when folded over, because one half seemed much wider. But this ended up being a faux problem, and was not an issue at all in the end. I'm just mentioning it in case other people encounter this and wonder if it's a mistake. I think the pattern drafters have factored in extra ease that takes into account the space used up when a thick fabric folds over on itself.

Not enough lining
After sewing my lining all the way around the Self facing, and having sewn my Self hem up already, I saw that the lining was not long enough to reach the seam allowance of the hem! I could not believe it, after all that drafting. I took out my pattern pieces and held them up, but the lining and coat were all the right lengths. I couldn't work out how this happened. Someone suggested my self fabric maybe stretched because I had been keeping it hanging up.

It is meant to extend past the line of stitching of the hem by the length of the seam allowance.

The front was fine, but the back became too short. I decided to add some length to the lining, as I didn't want to shorten the coat. I didn't think I had enough scraps as I had used so much of the fabric already, but luckily I did have some good shaped rectangles. I sewed these onto the back piece and later joined the short ends of the rectangles to part of the front to make sure there weren't any odd raw edges.


Sewing the lining hem to the self hem
Because of Sara's instruction to lengthen your front lining at one edge, and because of my added piece, my lining hem was a very strange shape and probably too long, since I just added a wide rectangle without measuring how much extra I needed. When it comes to the hem, you turn your coat inside out= rights sides together, and put raw edges together with the lining hem to the raw edge of the seam allowance of Self hem which is folded up and already sewn into place.
(BTW Sara says to do a blind hem of the Self fabric but I don't have a blind hem foot. I just hemmed it normally and sewed my lining to the seam allowance.)
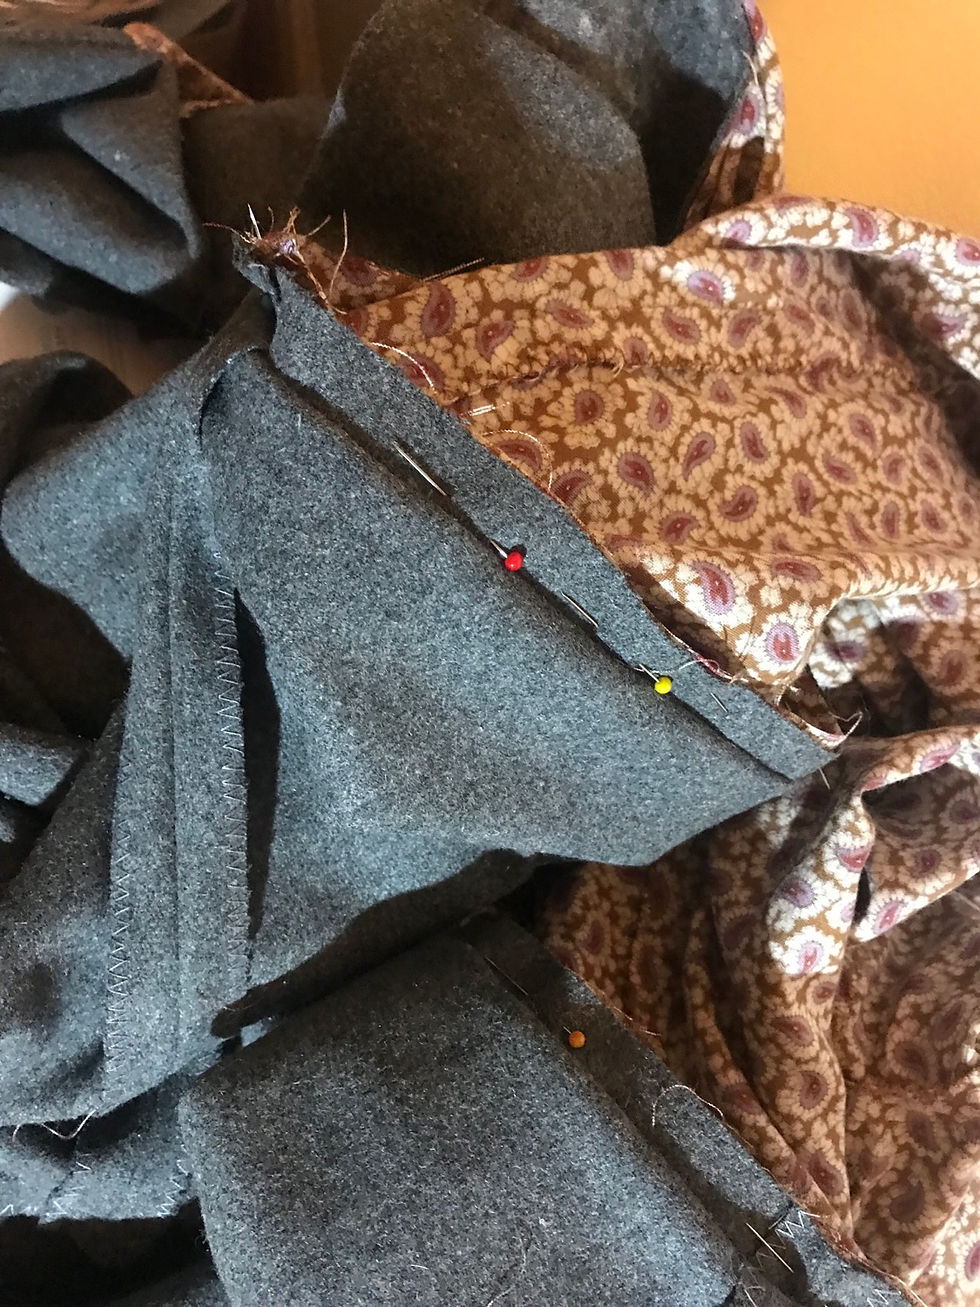
Here you can see the funny shape of my hem. It became slightly smoother when I sewed that hanging end of the rectangle onto the sloping raw edge of Front lining.

I couldn't trust my lining raw edge so had to work out at which point I should sew it to the coat, this was just trial and error really. It took me a couple of goes of pinning it as if it were sewn, turning it back right side out through the exit hole I left in the side seam to check, and adjusting.
I pinned it in place and got the length of the lining right. The only problem was that I didn't like the way the lining was sewn all the way to the hem at each centre front, becuase of Sara's instruction to lengthen the lining and sew it into the facing all the way to the bottom. Because the lining was then sewn into the seam allowance of the hem, which sits a couple of inches above the hem edge, the lining was not a straight line, and curved up towards the middle. I thought this looked really scruffy and uneven. Apparently, this is what is done in RTW though.

After some suggestions on Instagram (thanks!) I decided to take up lining where it meets the facings so that it doesn't go as low as the hem edge. I took it up to where the Self hem seam line is. I then would have more of a chance at getting an even line. In order to do this, I had to do some unpicking (more in my stories)- I unpicked the lining from the facing past the hem seam, the seam where the facing meets the Self so that I could fold under the raw edge of the facing that will be revealed once the lining change is made.
Not a very good photo but this is what it looked like before where the lining meets the facing all the way down to the hem edge (more images on my story)-

Here lining is unpicked to correct place and lying out.

I made a little snip in the facing seam allowance so it can be folded under at the bottom, but lie the other way all the way around (which is how it's been pressed).

Here I have unpicked the lining from the facing, turned the facing raw edge under, and folded up the lining to where it needs to meet the hem seam (which is marked by the pin).

Once sewn, it looks like this:

The line still isn't perfectly straight, if you want ease lengthwise it can't be, because you end up having the lining folding over itself at the bottom centre and as it gets more towards each facing it becomes higher up because it is sewn in flat in the corners with no excess.
Sleeves
I sewed the sleeve hems in the same way before I sewed the main hem (sewing the Self sleeve hems up leaving a raw edge and seam allowance visible on the wrong side, rather than folding over twice like with a normal hem). They were easier as I had the nice even raw edge of my lining to match to the raw edge of the Self hem's seam allowance. I had to shorten them because my sleeves were too long anyway, but that was simple.

As a tip, sew these hems from the side of the self, not the lining as shown in the photo above. This way you can see the fold that is created by the Self seam line and you can sew right up to it, but not through it. In this view you can see it:


I also loosely swing tacked the lining sleeve to the Self underarm to anchor it, going through the seam allowances of the underarm intersection on the wrong sides so it's hidden.

For the finishing touches
I was umming and ahhing over whether to invisble tack down the lapel. It was very difficult to make it fold over in the right place and be the right width all the way around without some extra help. Someone on Instagram suggested using poppers instead so that the collar can be unfolded. Great idea, but I wasn't sure about the look it would create when you do turn the collar up. I decided I would tack it, even if this means I can't turn my collar up against the wind. It makes for a sharper finish as I could get into the little fold where the collar turn starts/finishes. I used my exit hole to access the inside of the coat and sewed the lapel folded over onto the Self so that I didn't need to go through all layers including the lining and only going through one layer of the collar/lapel. This way the stitches are completely invisble and hidden on the inside and outside, as they sit between the lining and coat.
I hand-sewed by exit hole in my side seam closed, using a little slip stitch through the layers at the very top of the fold so that I could mimic a machine stitch as much as possible so the seam allowances could be pressed flat.

You can see the join of my extra panels and slices if you look close, but otherwise they stay pretty hidden.


Final thoughts
I'm very happy with how it turned out! It's been nice to learn some new skills by drafting a lining for the first time and getting to know how they work. They were a bit daunting before, even though I've lined two coats before. There's a big difference between following instructions already included in a pattern and having to apply instructions to your pattern and think more about how it might work. I'm so pleased that I could line the coat with complete paisley!


Pattern: Burdastyle 6704
Notions: interfacing, fabric
Sara's Blueprint lining class


Comments